

Reports, ALV, and module pool screens are familiar to most ABAP developers, but when it comes time to create a browser-based SAP application, many get caught off guard. This ABAP Web Dynpro tutorial demonstrates how to create a basic Flight List app that has a component, view, window node, context node, table binding, and button action” It not only explains how to use ECC 6.0 and SAP S/4HANA 2026 but also addresses the question of when Web Dynpro is still a good option when newer projects might choose to use Fiori, UI5, RAP, or Fiori elements instead.
You must have access to transaction SE80. The Object Navigator in SE80 provides the basis for creating and maintaining ABAP development objects such as Web Dynpro components, views, windows, applications, classes, and packages. For classic Web Dynpro for ABAP work, SE80 is still frequently used, but Eclipse-based ABAP tools can also be employed in some systems.
You also need the demo table SFLIGHT, or any custom table that contains simple test data. This tutorial builds component ZWD_FLIGHT_LIST, view MAIN, context node FLIGHTS, and application ZWD_FLIGHT_LIST_APP. The app will show flight rows in a browser table and refresh them with a button.
Before starting, confirm your user has developer access and authorization to create repository objects. If you work in a client on transport recording, create all objects in the correct package and request.
Step 1 — Start Your Web Dynpro ABAP Tutorial in SE80
Open SE80 and choose Web Dynpro Comp./Intf. from the object dropdown. Enter the component name ZWD_FLIGHT_LIST and choose Create. Select type Web Dynpro Component, assign a package or local object, and maintain a short description such as “Flight List Web Dynpro Demo.”
A Web Dynpro component is the main container for the app logic. It holds views, windows, controllers, context definitions, and methods. Think of it as the technical unit that groups the browser UI and ABAP logic.
When SAP creates the component, it also creates the component controller. The component controller can hold shared data and methods used by multiple views. For this beginner app, we will keep the example in the view controller to make the flow easier to follow.
Activate the component after creation. Activation checks whether SAP can generate the required runtime objects. If activation fails, fix the component error before creating extra objects.
This is the first point where many beginners get stuck. They create a component but forget that a component alone does not give users a browser URL. You still need a view, a window, and an application.
Step 2 — Create the View, Window, and Application
Create a view named MAIN. A view is the screen area where UI elements such as tables, buttons, labels, and input fields are placed. In Web Dynpro ABAP, each view has a layout, a context, and controller methods.
Create or use a window such as MAIN_WINDOW. A window connects views and navigation plugs. Even if this app has only one view, the application still needs a window to display that view in the browser.
Embed the MAIN view inside the MAIN WINDOW. In SE80, open the window and add the view to the window structure. Then set it as the default view if the system asks for a startup view. If you are comparing Web Dynpro with newer SAP application-development approaches, review SAP BTP application development before deciding on the frontend architecture.
Now create a Web Dynpro application, for example ZWD_FLIGHT_LIST_APP. A Web Dynpro application gives the component a runnable browser entry point. Without the application object, you may have a valid component but no direct app URL to test.
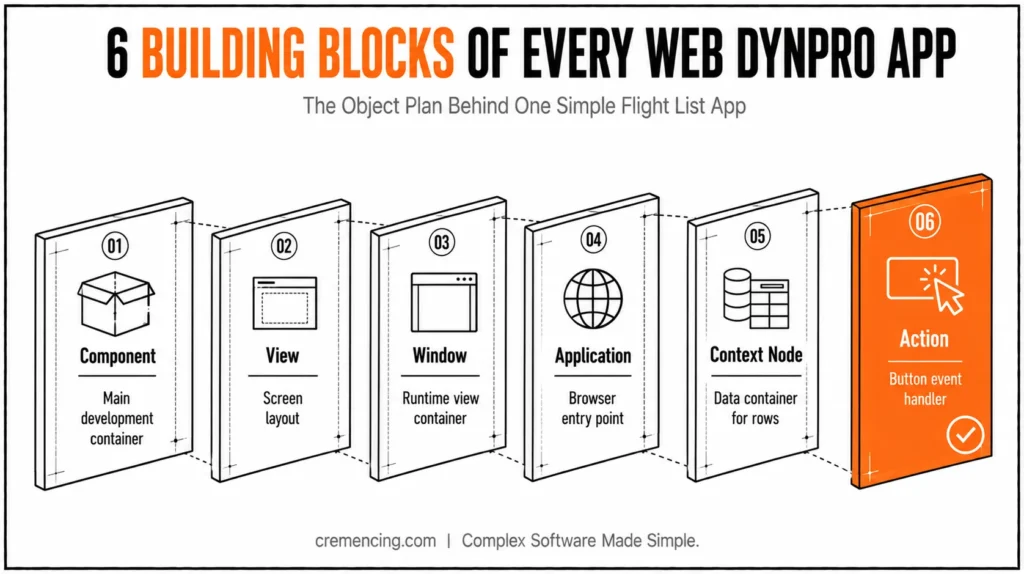
Use this object plan:
| Object | Name | Purpose |
| Component | ZWD_FLIGHT_LIST | Main development container |
| View | MAIN | Screen layout |
| Window | MAIN_WINDOW | Runtime view container |
| Application | ZWD_FLIGHT_LIST_APP | Browser entry point |
| Context Node | FLIGHTS | Data container for table rows |
| Action | REFRESH | Button event |
This structure looks small, but it teaches the core Web Dynpro pattern.
Step 3 — Define Context Nodes and Attributes
Context is the data container that connects ABAP logic with UI elements. If your context is empty, your UI table will also be empty. This is the most important concept in any web dynpro abap tutorial.
Open the MAIN view and go to the Context tab. Create a node named FLIGHTS. Set the node to hold multiple rows because the app will display a table of flights.
Use dictionary structure SFLIGHT if your system has the standard flight demo tables. You can add attributes manually too, but dictionary-based attributes save time and reduce spelling mistakes. Add fields such as CARRID, CONNID, FLDATE, PRICE, and CURRENCY.
A context node can be single-row or multi-row. For table output, use a node that supports multiple elements. If node cardinality is wrong, the table may not show data as expected. In plain ABAP terms, the context node behaves like an internal table that the screen can read. The controller code fills it. The layout binds to it. The browser displays the result. If you’re new to ABAP, start here.
For bigger apps, keep shared data in the component controller and map it to views using context mapping. Context mapping links a component controller context node to a view context node so multiple views can reuse the same data.
Step 4 — Bind UI Elements to Context
Open the MAIN view and go to the Layout tab. Add a Table UI element. A Table UI element displays multiple rows from a context node.
Bind the table data source to the FLIGHTS context node. Then create table columns and bind each column to a context attribute such as CARRID, CONNID, FLDATE, PRICE, and CURRENCY.
Add a Button UI element above the table. Set the button text to Refresh. Later, you will bind this button to an action named REFRESH.
Add a TextView title such as “Flight List.” A TextView displays read-only text. This helps users understand the screen before they see the table.
The layout should now have a title, a button, and a table. The UI still will not show data until the controller fills the context. That is why Web Dynpro beginners often see an empty browser page even though their layout looks correct.
This is also where an ABAP Dynpro tutorial differs from Web Dynpro ABAP. Classic Dynpro screens use screen fields and PBO/PAI modules. Web Dynpro uses context binding, controller methods, and actions.
Step 5 — Add ABAP Code in WDDOINIT
WDDOINIT runs when the Web Dynpro view controller is initialized. Use it to load the initial flight data into the FLIGHTS context node.
Create a private method named LOAD_FLIGHTS in the MAIN view controller” and add:
METHOD load_flights.

  DATA lt_sflight TYPE STANDARD TABLE OF sflight.
  DATA lo_node TYPE REF TO if_wd_context_node.

  SELECT *
    FROM sflight
    INTO TABLE lt_sflight
    UP TO 20 ROWS.

  lo_node = wd_context->get_child_node(
    name = 'FLIGHTS' ).

  lo_node->bind_table(
    new_items = lt_sflight ).

ENDMETHOD.
The method reads up to 20 rows from SFLIGHT, gets the FLIGHTS context node, and binds the result to it.
Then call the method from WDDOINIT:
METHOD wddoinit.

  wd_this->load_flights( ).

ENDMETHOD.
This keeps the initialization method short and lets you reuse LOAD_FLIGHTS later for the Refresh button.
Note: If your ABAP release and project standards use modern Open SQL syntax, the SELECT statement may use host-variable escaping such as @. Use the syntax supported by your target ABAP release.
Step 6 — Add an Action and Event Handler
Create an action named REFRESH in the MAIN view. An action represents a user event, such as button click. When the user clicks the button, Web Dynpro calls the generated event handler method.
Bind the Refresh button’s onAction property to action REFRESH. SE80 will create a handler method such as ONACTIONREFRESH. Put the refresh logic there.
METHOD on action refresh.
wd_this->load_flights( ). ” Reload FLIGHTS context node after button click
ENDMETHOD.
This code is small, but it proves the full event flow. The browser button triggers an action. The action calls ABAP controller logic. The controller updates the context. The bound table displays the refreshed data.
If the button does nothing, check three things first. Confirm the button has the correct action assigned. Confirm the handler method is active. Confirm the method updates the same context node that the table uses.
For real apps, actions can validate input, call classes, read selected table rows, navigate to another view, or update backend data. Start with a refresh action before adding complex logic.
Step 7 — Test the Web Dynpro Application
Activate all objects: component, view, window, methods, and application. Activation matters because the Web Dynpro runtime uses generated metadata and controller code. One inactive object can break the browser test.
Right-click the Web Dynpro application ZWD_FLIGHT_LIST_APP and choose Test. SAP opens the browser URL for the application. Log in if the system asks for credentials.
You should see the title, Refresh button, and flight table. The table should show up to 20 rows from SFLIGHT. If the table is empty, debug WDDOINIT and confirm the SELECT returns data.
Check the URL carefully if the page does not open. Web Dynpro applications depend on the HTTP service configuration and system URL. In some systems, Basis must ensure the needed ICF services are active.
This is where many old Web Dynpro ABAP PDF notes stop too early. A real tutorial must verify browser display, context data, action handling, and activation status. For a broader comparison of modern SAP frontend approaches, review the section on SAP development and customization with ABAP and Fiori.
Testing & Validation
Start testing from the database. Confirm SFLIGHT has data in SE16N or SE16, depending on your system policy. SE16N and SE16 are table display transactions used to inspect table records.
Next, test the controller logic. Set a breakpoint in WDDOINIT and run the application. Confirm lt_sflight receives data and lo_node points to the FLIGHTS context node.
Then check the table binding. Open the layout and confirm the table binds to node FLIGHTS. Confirm each table column binds to the correct attribute.
Test the Refresh button. Set a breakpoint in ONACTIONREFRESH and click the browser button. If the breakpoint does not stop, the button action is not connected correctly.
Finally, test with a browser refresh, different users, and another client if required. For transport, move the Web Dynpro component, application, related DDIC objects, classes, and any assistance class together.
Common Issues During Setup
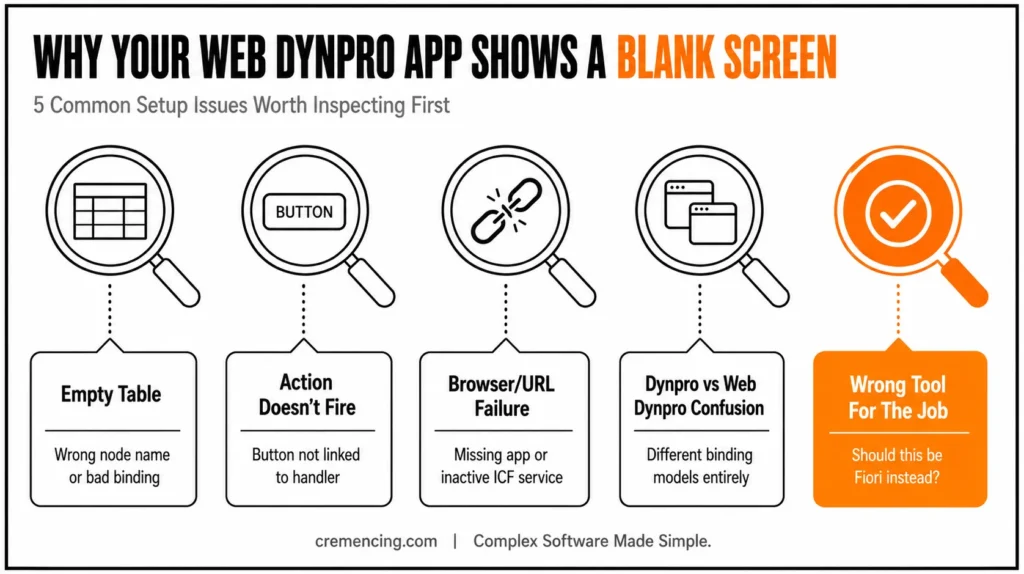
The first issue is an empty table. Usually, the SELECT returns no data, the context node name is wrong, the binding points to another node, or the node cardinality is not suitable for table output.
The second issue is an action that does not fire. Check the button’s onAction property, action name, generated handler method, and activation status. Also confirm you tested the latest active version.
The third issue is browser or URL failure. The application object may be missing, the ICF service may be inactive, the URL may point to the wrong client, or the user may lack authorzation.
The fourth issue is confusing Web Dynpro ABAP with classic Dynpro. Classic Dynpro uses SAP GUI screens and PBO/PAI modules. Web Dynpro ABAP uses browser rendering, context binding, view controllers, windows, plugs, and actions.
The fifth issue is using Web Dynpro for every new SAP UI requirement. In S/4HANA, compare the requirement with Fiori/UI5, RAP, Fiori elements, ALV reports, or simple SAP GUI tools before choosing Web Dynpro.
For ALV-style output, use SALV_WD_TABLE when the app needs Web Dynpro ALV features. A SAP Web Dynpro ABAP ALV tutorial usually starts after you understand component, context, and view embedding.
| Requirement | Web Dynpro ABAP | Fiori/UI5 + RAP | Classic Dynpro |
|---|---|---|---|
| Existing WDA application enhancement | Strong fit | Usually unnecessary migration | Not applicable |
| New browser-based S/4HANA UX | Evaluate carefully | Usually preferred starting point | Weak fit |
| Existing ABAP context/controller logic | Strong fit | Requires service/API design | Strong fit for SAP GUI |
| Responsive browser UX | Available, but framework is legacy-oriented | Strong fit | No |
| RAP-based service architecture | Not native | Strong fit | No |
| Existing ECC/WDA landscape | Strong fit | Evaluate based on frontend strategy | Strong fit where SAP GUI remains appropriate |
Conclusion
This Web Dynpro ABAP tutorial provides you with all the beginner steps: component, view, window, application, context, binding, ABAP code, action, browser test and validation. While Web Dynpro ABAP still has a place in many ECC and S/4HANA systems, it is important to select it wisely in the context of the UX. Develop the basic Flight List app first, and then on to ALV integration, navigation, and business logic.
In addition to the fundamentals, remember to consider the design of context nodes, the correct application of UI elements, and the reusability of components—those are crucial for a scalable and maintainable application. Try various browsers and screen resolutions as Web Dynpro is based on HTML rendering. Check performance in load-intensive applications, and communicate between several Web Dynpro applications via component interfaces.
If the requirement is a new S/4HANA user experience rather than maintenance of an existing Web Dynpro application, compare the approach with SAP Fiori custom application development.
Frequently Asked Questions
1. What are the advantages of Web Dynpro ABAP?
Web Dynpro ABAP is SAP’s framework for creating web-based applications in ABAP. It’s based on components, views, windows, controllers, context nodes, data binding, and actions. This is a basic tutorial on how to create a small Web Dynpro ABAP application to get an idea about how it works.
2. Is S/4HANA still using Web Dynpro ABAP?
Yes. Web Dynpro ABAP remains supported in relevant S/4HANA environments, although the exact available applications and development options depend on the release and deployment model.
3. Which transaction is used to create Web Dynpro ABAP?
SE80 is commonly used to create Web Dynpro ABAP components, views, windows, and applications. SE80 is the Object Navigator. Some systems also support Eclipse-based ABAP tools depending on release and development setup.
4. What is the difference between ABAP Dynpro and Web Dynpro ABAP?
ABAP Dynpro is classic SAP GUI screen programming with PBO and PAI modules. Web Dynpro ABAP is browser-based and uses controllers, context binding, views, windows, and actions. An abap dynpro tutorial is not the same as a Web Dynpro tutorial.
5. What is context in Web Dynpro ABAP?
Context is the data container that connects controller logic with UI elements. The controller fills context nodes and attributes, while the layout binds UI elements to them. If the context is empty, the UI usually shows no data.
6. What is WDDOINIT used for?
WDDOINIT initializes a Web Dynpro controller or view. Developers often use it to load initial data, prepare context nodes, or set default values. In this tutorial, WDDOINIT fills the FLIGHTS table node.
7. How do you display ALV in Web Dynpro ABAP?
Use SALV_WD_TABLE when you need ALV-style table output in Web Dynpro ABAP. It supports configurable table display inside a Web Dynpro app. [INTERNAL LINK: Web Dynpro ALV guide → SAP Web Dynpro ABAP ALV Tutorial with SALV_WD_TABLE]
8. Can I get a Web Dynpro ABAP PDF tutorial?
Many users search for web dynpro abap pdf because they want offline notes. You can save this tutorial as internal notes, but the best learning path is to build the component in SE80 and test the browser app yourself.
References
Creating Your First Application with Web Dynpro ABAP
Web Dynpro ABAP Development User Guide
Fundamentals of Web Dynpro for ABAP
Source: SAP Help Portal — Controllers in Web Dynpro for ABAP — https://help.sap.com/docs/SUPPORT_CONTENT/wdabap/3362186484.html
Source: SAP Help Portal — ALV Integration into Web Dynpro ABAP — https://help.sap.com/saphelp_autoid2007/helpdata/EN/42/bedb3b61cb1d65e10000000a1553f6/content.htm





One Response